In this article, I would like to talk about OAuth 2.0, which is used as a protocol (industry standard) for Authorization and OIDC (OpenID Connect) which is a top layer of the OAuth 2.0 and used for Authentication.
What are OAuth 2.0 and OIDC? What are they used for?
OAuth 2.0 and OIDC are industry standards used for Authorization and Authentication.
Every day we use mobile or web applications for our works. Defining username and password for each application, getting harder at some point. Some “password management” applications come into place etc.
History
In 2005 Brad Fitzpatrick developed an authentication protocol to remove these difficulties.
The main purpose of this protocol was to enable users to define user credentials to a central system/application (for example, Google) and to enable other applications using this protocol to perform relevant transactions using only the necessary information of the users. And this was done through certificates.
This developed protocol was not an open protocol, and at the same time, it was making the related transactions through certificates. OAuth Discussion Group which was created in 2007, started to create an open authorization protocol. In December 2007, the OAuth protocol was openly made available as v1.0 and in October 2012 it was finalized as OAuth 2.0.
In this way, OAuth 2.0 was filled the missing Authorization part of the OpenID protocol with a token based structure. Instead of certificates, identity-related transactions started to do with tokens.
Then, in 2004 an identity layer called OIDC (OpenID Connect) developed on the OAuth 2.0 Framework was added and thus Authentication processes were defined within a standard.
OAuth 2.0 Structure
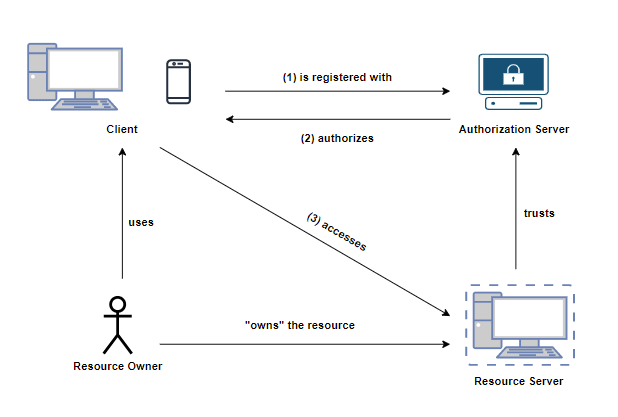
In the above picture, you can see the base structure of OAuth 2.0.
- In the most basic sense, when we as a user (Resource Owner) want to access our own data, we enter the relevant website (Client) and send a request to the relevant URL. The relevant website communicates with the Authorization Server to query whether we have access to that resource. As a result, the relevant server indicates that we have authorization. We reach the information we want to access as a result that returned by the Resource Server.
The Resource Owner, Client, Authorization Server, and Resource Server are defined as Roles in OAuth 2.0 protocol.
- OAuth 2.0 offers different types of Authorization Flows according to different usage conditions and these flows are named as follows.
- Authorization Code Flow
- Implicit Flow
- Resource Owner Password Credential Flow
- Client Credential Flow
Authorization Code Flow is used in Server Side applications and Implicit Flow is used in Browser Based (SPA’s) applications.
In these flows, although the basic logic is the same (authorization, token exchange, etc.), the number of steps and methods applied are different. As an example, let’s examine the frequently used Authorization Code Flow together with the related endpoints.
Example: OAuth 2.0 - Authorization Code Flow
We can examine this flow in 4 steps:
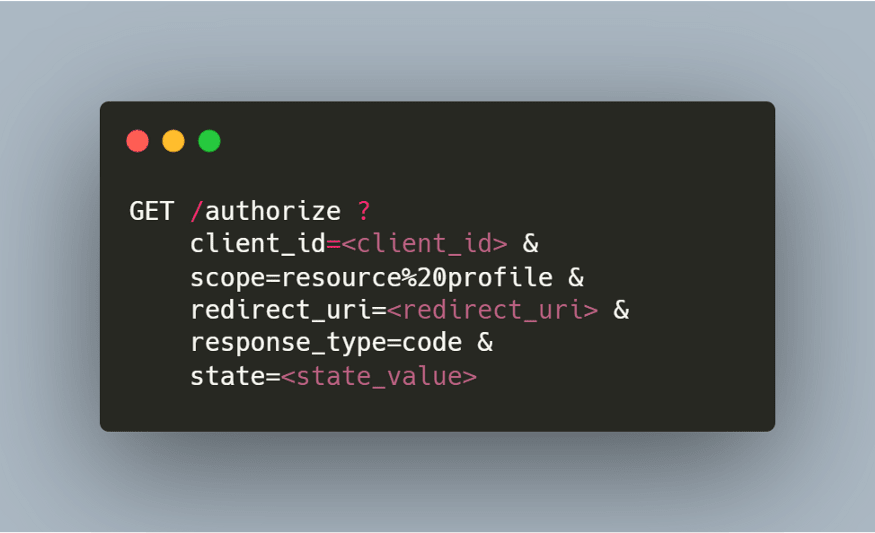
1-) Authorization Request
-
If we examine the related request, we can see that we passed a query parameter named “client_id”. This “client_id” represents our application defined within the OAuth 2.0 protocol. In other word, it’s a value that identifies the relevant application. The “scope” parameter specifies the scope of the relevant authorization. In other words, the user is only allowed to see the relevant information in the
resourceandprofilescope above. User can’t access any other part of the application (e.g. delete contact) by using the generated token. -
“Redirect_uri” represents the URL where the application we are using will get and use the relevant token.
-
The most important parameter here, the “response_type” parameter, shows which flow the request will be made with. (“code” for Authorization Code Flow)
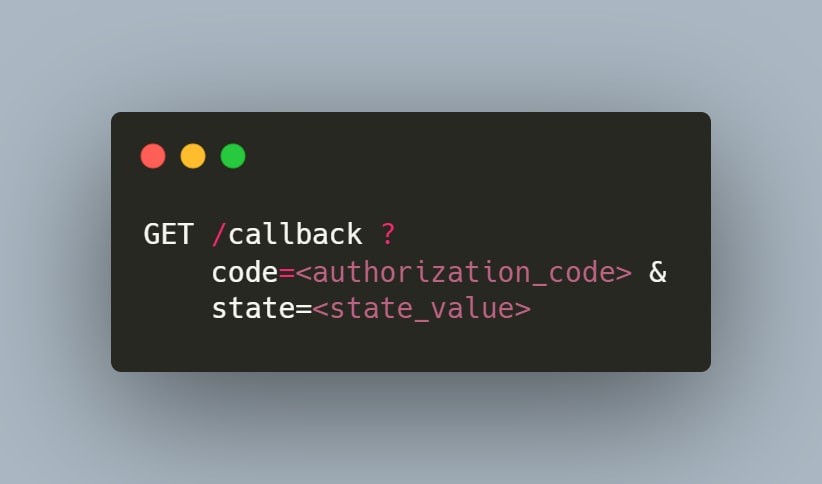
2-) Authorization Response
After the Authorization Server ensure that the relevant request is valid and in the correct format as well, it sends a GET request with the Authorization Code to the relevant callback url (redirect_uri) specified in the request.
3-) Token Request
After obtaining the Authorization Code, a token request is made by using the relevant Authorization Code to obtain a Access Token. (Token exchange => Authorization Code ↔ Access Token)
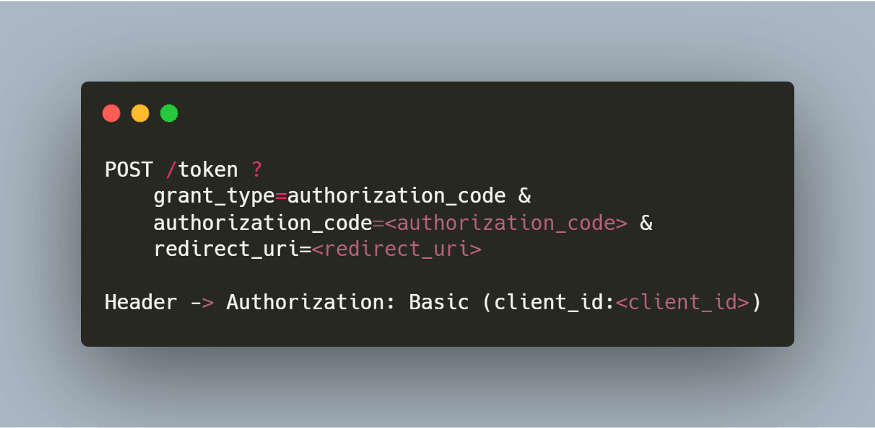
- As can be seen in this request, Authorization Code is specified as the
grant_typeand if this request is successful Authorization Server redirects us to the route specified in the “redirect_uri” parameter.
4-) Token Response
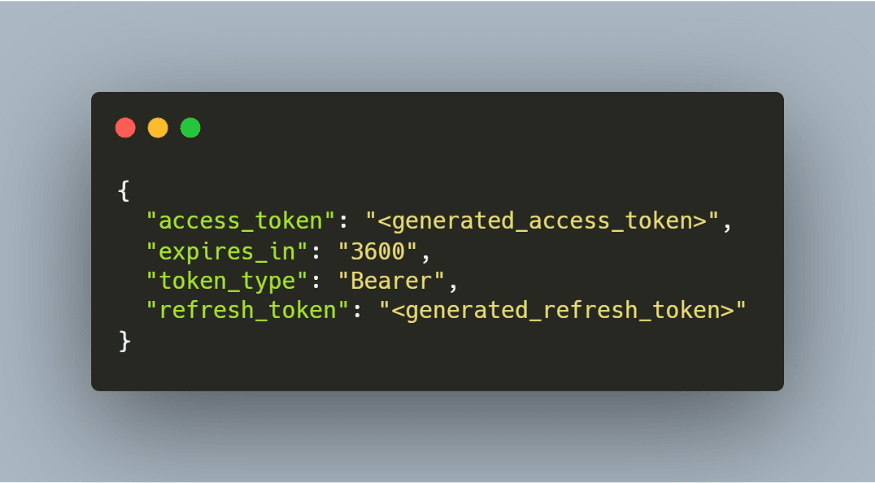
If the “Token Request” we made in the third step is successful, a similar response returns as below and can be used by the Client (the application we want to use).
-
Now, with this “access_token” the user can access its own data from Resource Server through the Client.
-
Here, if the “refresh_token” is also returned as a result of the request, when the “access_token” expires, a request can be made to renew the related “access_token” with this token.
OIDC (OpenID Connect) Structure
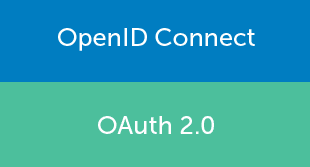
Simple identity layer on top of the OAuth 2.0 protocol.
OpenID Connect can be thought of as an identity layer added on top of the OAuth 2.0 protocol to enable the OAuth 2.0 protocol to be used for Authentication.
OpenID Connect contains a meta-data document (.well-known/openid-configuration) that defines the information required to login through an application. (Which urls should be used, which scopes it contains, etc.)
If you want to view the relevant metadata document as an example, you can access the Microsoft’s OIDC metadata document by navigating to https://login.microsoftonline.com/common/v2.0/.well-known/openid-configuration.
As in OAuth 2.0, transactions are performed using flows in OIDC. As an example, let’s examine the endpoints of Authorization Code Flow for OIDC as in OAuth 2.0.
Example: OAuth 2.0 - Authorization Code Flow
We can examine this flow in 6 steps:
1-) Authentication Request
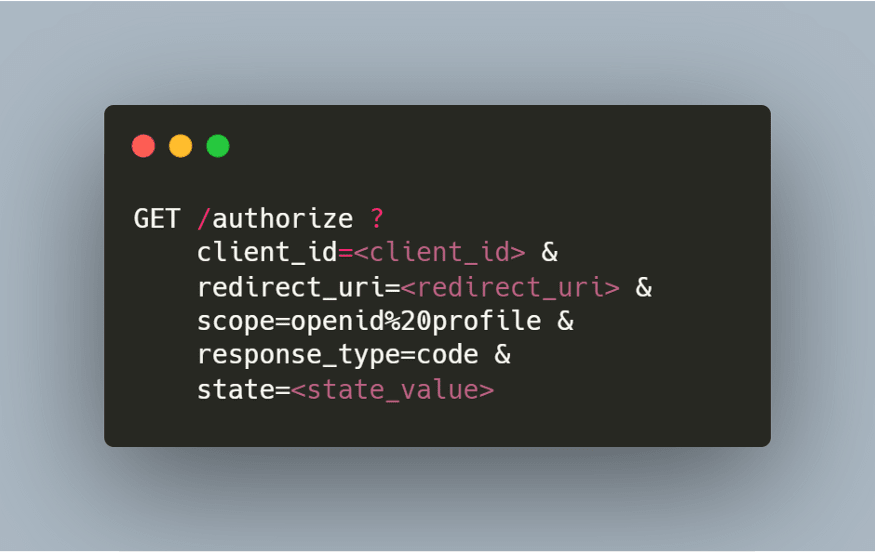
- If we examine the related endpoint, we can see that a value called openid is passed in the scope section. We can actually think of this as the equivalent of the identity layer concept we used when defining OIDC. With this scope added to the OAuth 2.0 protocol, Authorization Server now handles the relevant request within the scope of OIDC.
2-) Authentication Response
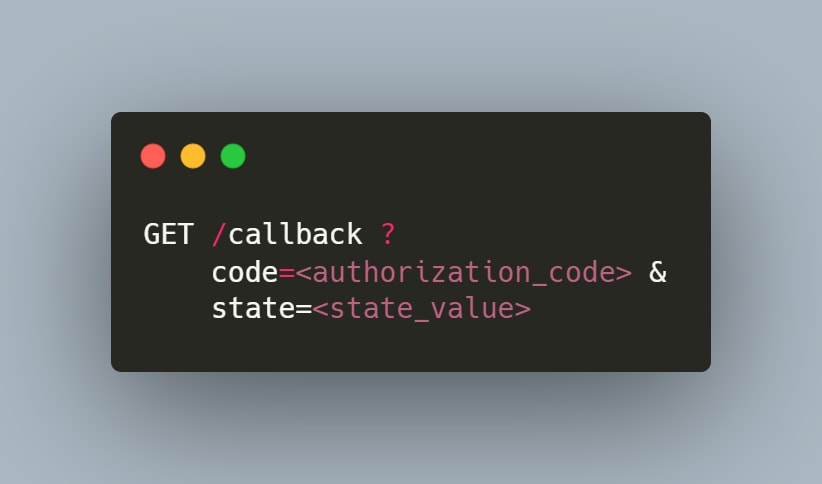
- Here, as in OAuth 2.0, a GET request is sent to the callback-url (redirect-uri) with the
Authorization Code. In this way, the Client becomes aware of the relevant authorization code.
3-) Token Request
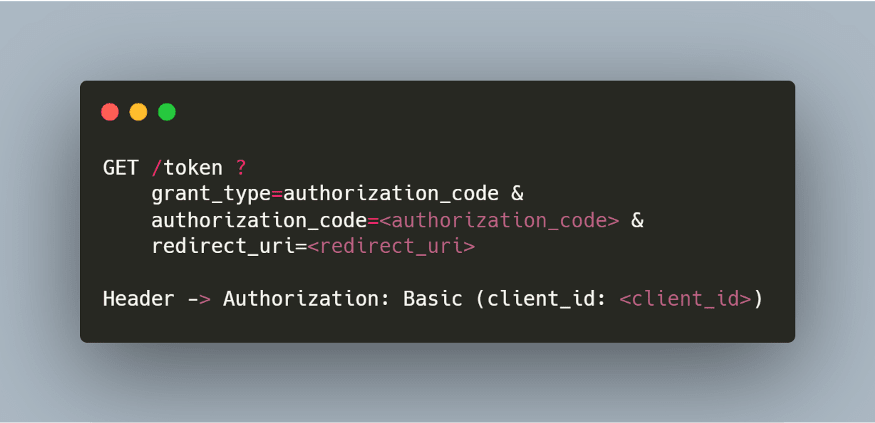
- Then, the relevant Client requests a token from the Authorization Server with the “authorization_code” it has obtained. (Token exchange => Authorization Code ↔ Access Token)
4-) Token Response
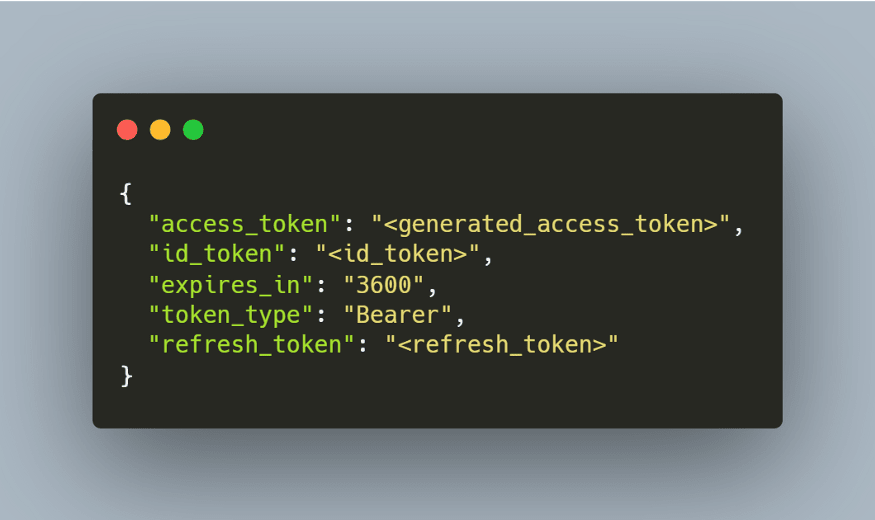
If we examine the response we can see the “id_token” section.
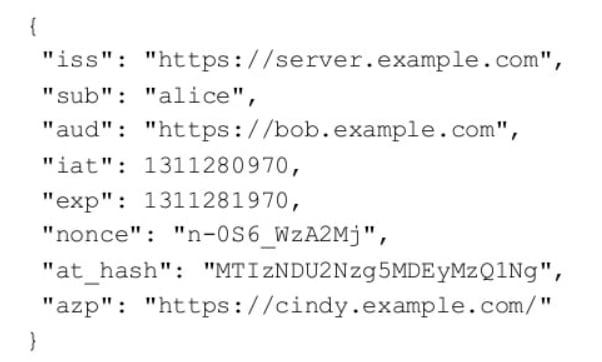
- ID_Token: It can be thought of as an identity card. Contains information about the end user. It is in JWT format. It can be thought of as the add-on that OIDC brings to OAuth 2.0. In this way, the Authentication process can happen.
5-) UserInfo Request - Obtaining End User’s Information
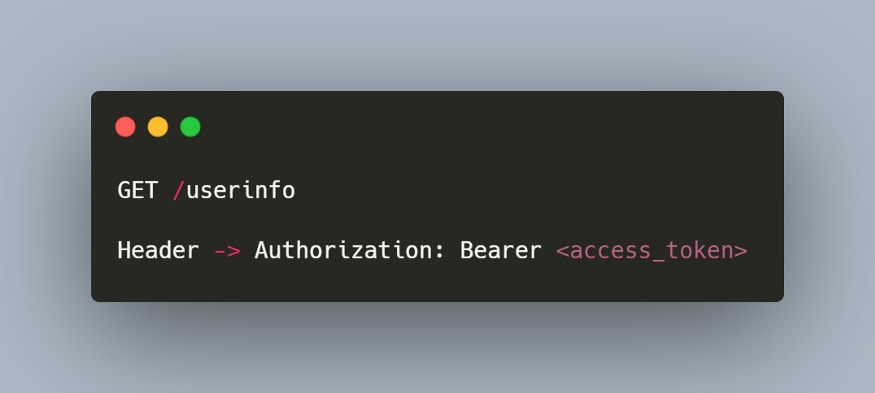
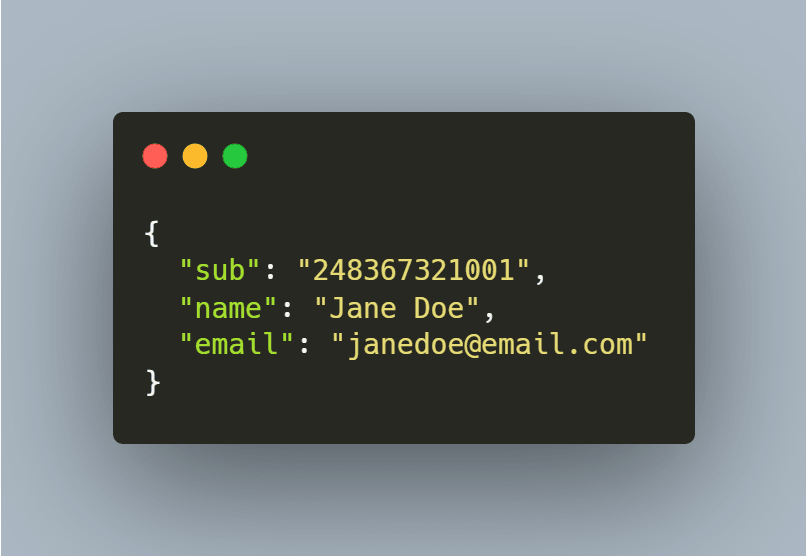
- The UserInfo endpoint returns information about the logged in user (name, surname, etc.). When the client needs the information of the relevant user, he can obtain the necessary information by using this endpoint. (Note that the relevant user is now authenticated and a request is made to the endpoint using the Bearer Authorization.)
6-) UserInfo Response
-
If the request that we made in the previous step is successful, the user’s information receives.
-
As another method, the user’s relevant information can be accessed by decoding the previously generated “Id_Token” value.
Thanks for reading this article, I hope you’ve enjoyed it. See you in the next article…

