
In this article, I will talk about how we can publish a package that we have created, on both GitHub and NuGet.
I will try to explain the publishing process with a concrete example. We will publish a package named SeoHelper (both on NuGet and GitHub Packages), which I created this week.

Publishing a Package to Github Packages
I created a repository named SeoHelper a few days ago and intended to create a package that helps developers to add meta-tags, sitemap.xml and robots.txt into their project easily.
You can simply create sitemap.xml and robots.txt files according to the relevant definitions, adding the relevant meta-tags (including the open-graph and Twitter card tags) between the <head>…</head> tags for applications by using this package.
After the related development, I created a new project (razor-page project) to perform the tests, and then I tested the package I developed by giving local references to the project I had created. While performing these operations, I wondered if I could use the related package by defining it as private on Github, and I started researching on this subject.
After a few articles I read, I was able to publish the relevant NuGet package as private on Github by determining the steps I need to perform. (Also, when I made the relevant repository public later, I was able to publish the relevant package publicly via NuGet.)
1 - First, I started by making the definitions of the relevant package. For this, I defined a <PropertyGroup> in the SeoHelper.csproj file and defined the relevant package information as follows:
<PropertyGroup>
 <TargetFramework>net5.0</TargetFramework>
  <PackageId>SeoHelper</PackageId>
  <Version>1.0.0</Version>
  <Authors>Engincan Veske</Authors>
  <PackageDescription>SeoHelper helps you to add meta-tags, sitemap.xml and robots.txt into your project easily.</PackageDescription>
  <RepositoryUrl>https://github.com/EngincanV/SeoHelper</RepositoryUrl>
</PropertyGroup>
2 - Then I ran the dotnet pack --configuration Release command via the terminal (in the directory where the SeoHelper.csproj file is located). In this way, the project was built and the NuGet package (with .nupkg extension) was created.
Then, when we open the bin/Release folder, we can see that a file named SeoHelper.1.0.0.nupkg has been created. (We will later use this file to share the relevant package publicly on NuGet.)

We have 2 steps left to publish this created NuGet package with the .nupkg extension on Github. First, create the NuGet.Config file, then create a PAT (Personal Access Token) on Github and run it with the relevant command.
3 - Let’s create the NuGet.Config file and update it as follows:
<?xml version="1.0" encoding="utf-8"?>
<configuration>
    <packageSources>
        <clear />
        <add key="github" value="https://nuget.pkg.github.com/OWNER/index.json" />
    </packageSources>
    <packageSourceCredentials>
        <github>
            <add key="Username" value="GITHUB_USERNAME" />
            <add key="ClearTextPassword" value="GITHUT_PAT" />
        </github>
    </packageSourceCredentials>
</configuration>
Here we need to enter our Github username and the Personal Access Token. (Username and ClearTextPassword fields.)
4 - Then all we need to do is run the following command in the terminal:
dotnet nuget push “bin/Release/SeoHelper.1.0.0.nupkg” — -api-key YOUR_GITHUB_PAT --source “github”
Here, instead of YOUR_GITHUB_PAT, we need to run the command by typing the Personal Access Token we created on Github. If we examine this command, we can see that we have specified “github” as the source. In this way, related transactions are automatically provided via our Github information (username and PAT) that we have defined in NuGet.Config file.
After running this command, we should get an output similar to the one below:

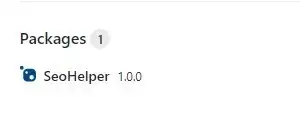
Then, if we open our repository and look at the Packages section, we should be able to see the relevant package (https://github.com/EngincanV?tab=packages&repo_name=SeoHelper):
Publishing a Package to NuGet
In this section, I will show you how to upload a
*.nupkgpackage via NuGet’s Upload Package section. You can also use the dotnet CLI to publish a package to NuGet. You just need to use thedotnet nuget pushcommand. See this document for more info.
Publishing a package to NuGet is really straightforward process. After creating a .nupkg package (as we did in the previous section), we just need to upload this file (SeoHelper.1.0.0.nupkg) through NuGet’s Upload Package page:
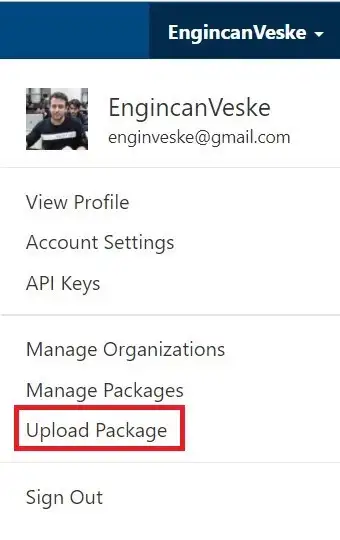
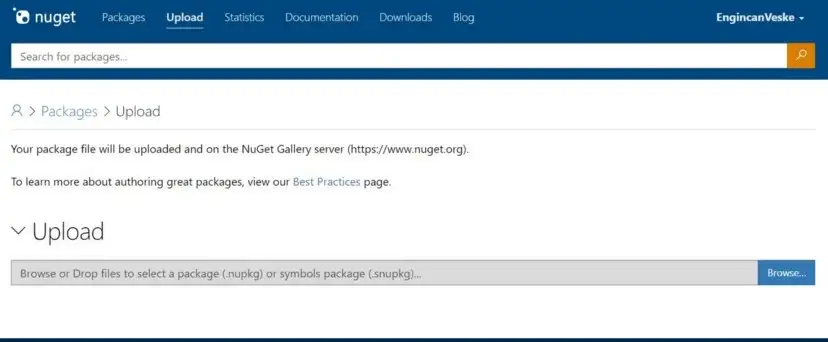
After clicking on the relevant link, an upload form similar to the one below will appear. Here we need to load our SeoHelper.1.0.0.nupkg package into the form field and make the relevant package descriptions:
Here, after installing the package, our package is put on hold for verification, and after the relevant verification process is completed, the relevant package is now available to everyone via NuGet:
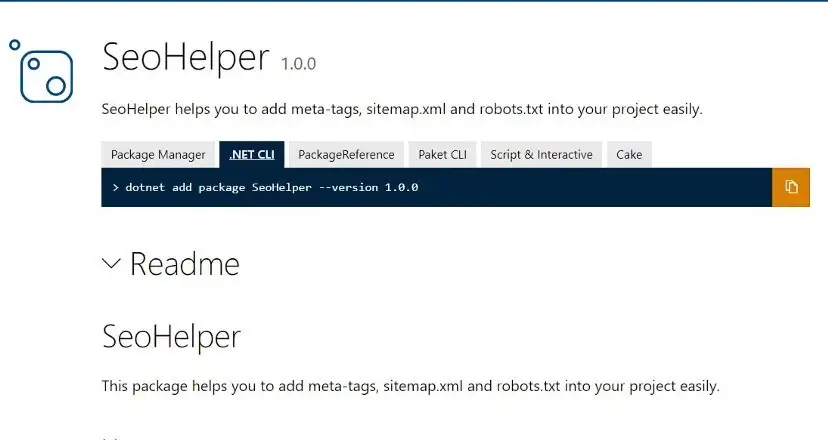
You can check the SeoHelper package from: https://www.nuget.org/packages/SeoHelper
Thanks for reading the article. I hope you find it useful. See you in the next one.
